I mentioned at the end of my
previous blog article on the Raspberry Pi that I had a DAC board in transit. Well it has arrived, I’ve fitted it and after a few trials and tribulations, it is set up and working well.
The attraction of having an onboard DAC in the Pi is really one of neatness. It also frees up one of the USB ports that I would otherwise use to feed a USB DAC (for example I can boot the Pi into
Squeezeplug, and use the Pi as a
Logitech Media Server with
Squeezelite as a player). The case that I’m using for the Pi doesn’t really offer a lot of room for manoeuvre when installing additional boards, but in the end I bodged together a neat enough solution.
The HiFiBerry
The
HiFiBerry DAC is a small printed circuit board about half the area of the main Raspberry Pi board. It attaches to a set of 8 connecting pins - the onboard sound connector P5 - you have to solder an 8-pin header to the Raspberry Pi main board first.
I’d ordered the board with two RCA connectors, but no headphone style jack plug. The RCA connectors were three pin sockets, obviously intended to be soldered to the board. It was immediately clear that this would mean the Pi would no longer fit in the case, so I decided to connect the RCAs via wires to the board, and mount the RCAs in the lid of the case. The board came with the GPIO and P5 sockets already soldered.
Assembly
Step 1 - I soldered the P5 header to the Raspberry Pi board. This proved pretty easy. The P5 sits right next to the GPIO connectors.
Step 2 - I soldered four wires to the output terminals intended to output to a 3.5mm jack. Two from GND to the GND tag of the RCA sockets, and one from the L and R channels to the appropriate tag of the RCA sockets.
Step 3 - I drilled two holes in the case lid. I also needed to remove some bits of plastic from what appear to be strengthening ribs in the case lid to allow it to fit over the HiFiBerry board. I fixed the RCA sockets into the holes, which needed a spot of araldite to hold them firm.
Step 4 - I mounted the HiFiBerry board on the P5 connector - it also slots onto the GPIO header for added support. The card came with a polythene pillar and screws to further support it in place, so I fitted those.
Step 5 - I assembled the case back together, inserted the SD card and booted the Pi.
[caption id="attachment_2499" align="aligncenter" width="300"]
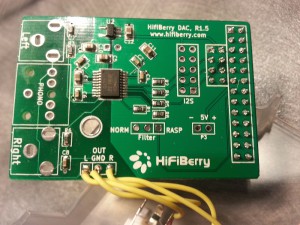
Upper side of HiFiBerry board[/caption]
You can see the wiring I added to connect the RCA sockets to the board. Obviously, the sockets supplied are intended to be soldered to the board in the positions labelled 'Left' and 'Right'.
[caption id="attachment_2501" align="aligncenter" width="300"]

The underside of the HiFiBerry board[/caption]
There's not much to see on this view of the HiFiBerry - other than my soldering, and the two connectors that attach the board to the Raspberry Pi - the board came with these already fitted.
Using the
piCorePlayer web interface, I selected the option for the HiFBerry DAC, determined the ALSA settings for the HiFiBerry and entered them, and saved the whole setting to the SD card. Then I excitedly hooked up the phono cable to my amplifier, booted the Pi and sat back to listen to the music.
Well, I could listen to the right hand channel, but the left channel was sadly absent!
A problem!
Clearly I’d done
something wrong! I referred to the forums on the HiFiBerry site. Most people having this sort of trouble had evidently made minor cockups with soldering, though there were hints that some cards may have been defective. A quick email elicited a rapid response suggesting I check the connectors for evidence of shorting out. I did this, finding no problems. As an aside, I found Daniel at CrazyAudio very responsive and polite in the face of a neophyte solderer asking questions.
A little while later, it occurred to me that the two non-ground pins of the RCA connector might not be equivalent - in particular, it wasn't easy to see how they connected within the socket. I plugged in an RCA plug into the L channel socket and used my multimeter to determine if the signal wire from the plug actually made electrical contact with the tag to which I’d soldered the wire from the board. It didn’t, so after a bit more investigation I detached the wire and soldered it to the third tag of the connector. At this point the Pi was properly outputting audio from both channels!
Triumph!
So, how does the Pi perform as a media player with the onboard DAC? First impressions are that it compares well with the two external DACs I have available, though both are budget items (a Cambridge Audio DACmagic 100 and DACmagic XS). More on this later, though I'm not really a serious audiophile and I've no way of doing a proper blind test.
 Upper side of HiFiBerry board[/caption]
You can see the wiring I added to connect the RCA sockets to the board. Obviously, the sockets supplied are intended to be soldered to the board in the positions labelled 'Left' and 'Right'.
[caption id="attachment_2501" align="aligncenter" width="300"]
Upper side of HiFiBerry board[/caption]
You can see the wiring I added to connect the RCA sockets to the board. Obviously, the sockets supplied are intended to be soldered to the board in the positions labelled 'Left' and 'Right'.
[caption id="attachment_2501" align="aligncenter" width="300"] The underside of the HiFiBerry board[/caption]
There's not much to see on this view of the HiFiBerry - other than my soldering, and the two connectors that attach the board to the Raspberry Pi - the board came with these already fitted.
Using the piCorePlayer web interface, I selected the option for the HiFBerry DAC, determined the ALSA settings for the HiFiBerry and entered them, and saved the whole setting to the SD card. Then I excitedly hooked up the phono cable to my amplifier, booted the Pi and sat back to listen to the music.
Well, I could listen to the right hand channel, but the left channel was sadly absent!
A problem!
Clearly I’d done something wrong! I referred to the forums on the HiFiBerry site. Most people having this sort of trouble had evidently made minor cockups with soldering, though there were hints that some cards may have been defective. A quick email elicited a rapid response suggesting I check the connectors for evidence of shorting out. I did this, finding no problems. As an aside, I found Daniel at CrazyAudio very responsive and polite in the face of a neophyte solderer asking questions.
A little while later, it occurred to me that the two non-ground pins of the RCA connector might not be equivalent - in particular, it wasn't easy to see how they connected within the socket. I plugged in an RCA plug into the L channel socket and used my multimeter to determine if the signal wire from the plug actually made electrical contact with the tag to which I’d soldered the wire from the board. It didn’t, so after a bit more investigation I detached the wire and soldered it to the third tag of the connector. At this point the Pi was properly outputting audio from both channels!
Triumph!
So, how does the Pi perform as a media player with the onboard DAC? First impressions are that it compares well with the two external DACs I have available, though both are budget items (a Cambridge Audio DACmagic 100 and DACmagic XS). More on this later, though I'm not really a serious audiophile and I've no way of doing a proper blind test.
The underside of the HiFiBerry board[/caption]
There's not much to see on this view of the HiFiBerry - other than my soldering, and the two connectors that attach the board to the Raspberry Pi - the board came with these already fitted.
Using the piCorePlayer web interface, I selected the option for the HiFBerry DAC, determined the ALSA settings for the HiFiBerry and entered them, and saved the whole setting to the SD card. Then I excitedly hooked up the phono cable to my amplifier, booted the Pi and sat back to listen to the music.
Well, I could listen to the right hand channel, but the left channel was sadly absent!
A problem!
Clearly I’d done something wrong! I referred to the forums on the HiFiBerry site. Most people having this sort of trouble had evidently made minor cockups with soldering, though there were hints that some cards may have been defective. A quick email elicited a rapid response suggesting I check the connectors for evidence of shorting out. I did this, finding no problems. As an aside, I found Daniel at CrazyAudio very responsive and polite in the face of a neophyte solderer asking questions.
A little while later, it occurred to me that the two non-ground pins of the RCA connector might not be equivalent - in particular, it wasn't easy to see how they connected within the socket. I plugged in an RCA plug into the L channel socket and used my multimeter to determine if the signal wire from the plug actually made electrical contact with the tag to which I’d soldered the wire from the board. It didn’t, so after a bit more investigation I detached the wire and soldered it to the third tag of the connector. At this point the Pi was properly outputting audio from both channels!
Triumph!
So, how does the Pi perform as a media player with the onboard DAC? First impressions are that it compares well with the two external DACs I have available, though both are budget items (a Cambridge Audio DACmagic 100 and DACmagic XS). More on this later, though I'm not really a serious audiophile and I've no way of doing a proper blind test.