 A few years ago, I obtained a 6th Generation iPod Nano by virtue of a product recall (the 1st Gen nano had a battery problem). I've used the replacement iPod far more than the 1st Gen version, so I was a bit dismayed when the power button stopped working a month or so ago. Repair via Apple didn't seem terribly worthwhile, so I investigated whether it might be possible to sort this out myself. When the 6th Gen iPod Nano was released, iFixit wrote a teardown guide - there's an astonishing amount of stuff crammed into a tiny case! I found a blog with a description of how to fix the power switch problem, which seems to be relatively common. After a bit of procrastination, I set about attempting the repair. It's not quite clear what the malfunction really is - there's a surface mounted switch (it's the gold coloured circle mentioned in step 7 of the repair instructions), and I guess that something wears out or gets dislodged making it inoperative. I didn't really have the specialised tools needed - I used the plastic lid of a Bic biro pen as a spudger/lever, the tweezers from a Swiss army knife, and the small blade of the knife as a screwdriver. To get in, I used a hairdryer to melt the glue and the knife to lever up the screen. I avoided disconnecting the screen or detaching it completely, and once I had the battery loose, I used a rubber band to hold it to the screen. I noted that of the four screws you remove for the repair, there are three different sizes (all tiny!) - I took a quick photo and labelled it so I knew where they go. I fashioned a small square of plastic to glue to the gold switch with contact adhesive. Too much of the original glue was lost, so I reattached the screen with a contact adhesive using a bulldog clip to hold the screen down while the glue set. The result was a bit messy, and I doubt the unit is waterproof any more. But hey, once I had reassembled the iPod, the switch was working again. Who knows how long for...
Tech
An electromagnetic field is generated from a circuit behind the screen. The S Pen picks this up and uses it to power itself and figure out its position relative to the screen. It sends this, along with information from the S Pen button and the nib at the end, back to the Note.At that point, it was abundantly clear that my next tablet purchase was likely to be a Samsung Note device. And on a recent visit to a department store I had a little play with a Samsung Galaxy Note Pro 12.2 tablet - and my partner bought one. After a weekend of seeing this device in action, I bought one too - reduced in price to £324. Anyway, for me (and the work I do) this is an iPad killer - for example:
- Bigger screen, at a very decent resolution
- Android 4.4.2 (this is like climbing over the wall of the Apple prison)
- The S pen, which offers realistic sketch pad and handwriting recognition
- Easier file transfer to and from the device than iTunes allows
- Ability to add to the 32Gb onboard memory - I added a 64Gb card
- Most of the apps I use on the iPad are also available on the Galaxy, and those that aren't have perfectly good alternatives
- You can run up to 4 apps simultaneously onscreen.
I’m always interested in tinkering with alternative audio usage of my Raspberry Pi devices. As standard, I’m using them as Squeezebox substitutes, running the minimalist OS piCorePlayer, though I’ve also tried Squeezeplug and Raspbian for this. Rune Audio, which I think is derived from RaspyFi as a fork at the time RaspyFi became Volumio (though I may have that the wrong way round), recently released a version 0.3 beta for the Raspberry Pi, so (being naturally curious) I decided to try it out.
[caption id="attachment_3345" align="alignnone" width="1000"]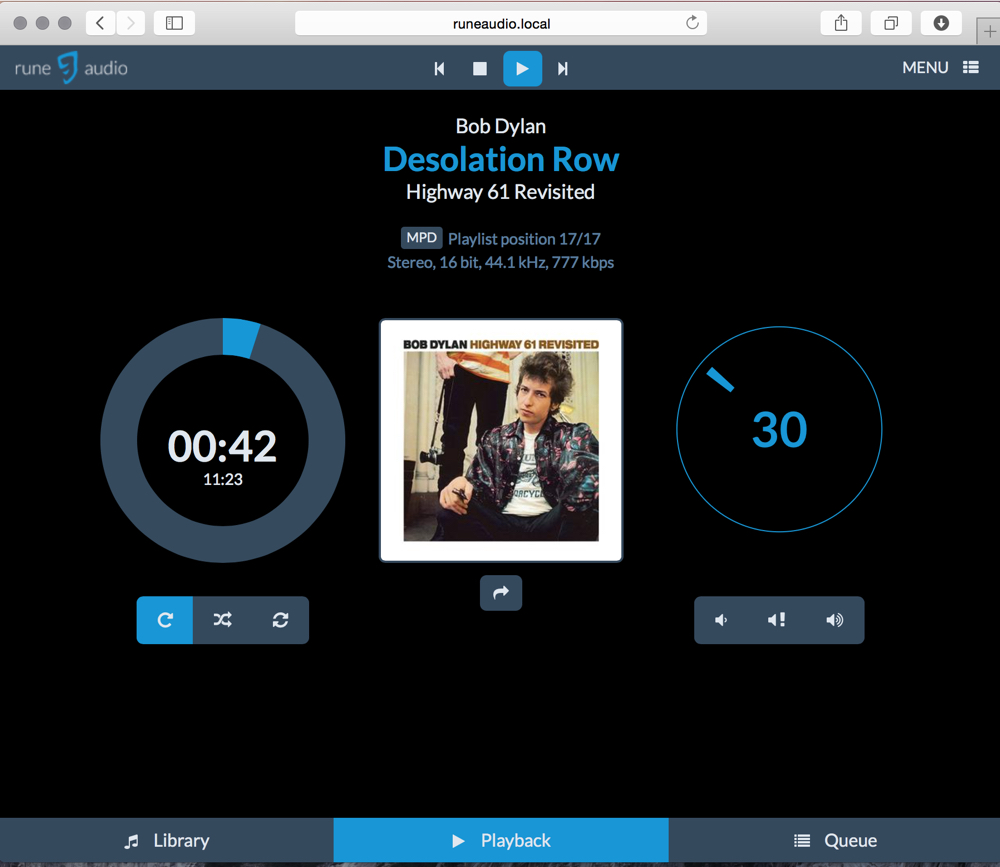 Runeaudio's UI is elegant, clear and simple[/caption]
Rune Audio is managed via a web browser. The picture above shows what the main interface looks like. The bar at the bottom allows you to switch from Library to Playback or Queue (pretty self-evident what those are). Image art is centre stage, with the progress wheel on it's left (big number is elapsed time, smaller is track length), while on the right is the software volume control. The play controls are a little counter-intuitive - this is a screengrab while a track is playing, and I would have expected the play symbol to have been replaced with a pause symbol. Finally, the Menu link at top right is where you access most of the setup functions.
Installation is trivial - just download the zipped image file, unzip it and burn the card. After booting the Pi, it’s pretty straightforward - in principle at least - to get the device working. All configuration is done via Rune’s web interface to its Arch Linux-based OS, called Rune UI. You can reach this by pointing a browser at runeaudio.local or at the device’s IP address.
Despite the fact that the majority of settings (such as the USB DAC) are setup by default, I had quite a few issues getting Rune Audio sorted, and at least some of these are down to my ignorance of how Rune UI and its underlying system work. In my own defence, the documentation pages are a little empty at the moment. For example, music playback of files located on local or NAS drives uses MPD (Music Player Daemon), while you seem to need to switch to a separate music renderer to play Spotify streams.
My first issue was persuading RuneAudio to mount my NAS, which is a QNAP device holding about 500Gb music files - a shade under 20,000 tracks, mostly a mix of flac and mp3 files, though with a few alac and wav. These files are all tagged in a way that satisifies Logitech Media Server (LMS), which I have running on the NAS, and feeding several Squeezeboxes and allied devices. In the end, this seemed to work once I’d created a mount folder under /mnt/MPD/NAS - I did this on the command line after logging in via a terminal on my laptop. Essentially, you go to Menu>Sources and choose Network or USB mounts. I found I couldn't make my NAS connect via NFS, and went for SMB/CFS.
Once the NAS was mounted, I needed to have MPD scan the folders of music and generate the database that’s used to navigate the music collection. This scan took ages on WiFi, around 2h for my 20,000 or so tracks. It's quicker via ethernet.
You navigate between the Library, Playback and Queue screens using the buttons at the bottom of the screen. The Library screen shows six options, where you can select to play music from files on a NAS; an attached USB storage device; Spotify (you need a Premium account for this); Jamendo (described as the World’s largest platform of free music - I haven’t tried this); My Web Radios (I haven’t tried this yet); and Dirble, which is apparently another radios stations thing. Note that under Spotify it says “click to switch renderer” - this turns out to be significant.
If you select the NAS option, you can select the NAS you want to attach to. I presume this can allow several NAS devices to be used. After this, the music collection is organised in hierarchy, as expected, of Artist > Album > Tracks. Oddly, the Artist and Album names seem to follow folder names rather than the tags in the files. I’m not sure whether this is how MPD is supposed to work, but it seems a little clunky compared with LMS. LMS also offers quite a few options for browsing and searching the music collection which Rune UI does not. This may be because Rune is a relatively new project, or perhaps because the developers are keen to keep a straightforward UI.
[caption id="attachment_3346" align="alignnone" width="1000"] Select library on NAS, USB storage, Spotify, etc[/caption]
[caption id="attachment_3347" align="alignnone" width="1000"]
Select library on NAS, USB storage, Spotify, etc[/caption]
[caption id="attachment_3347" align="alignnone" width="1000"]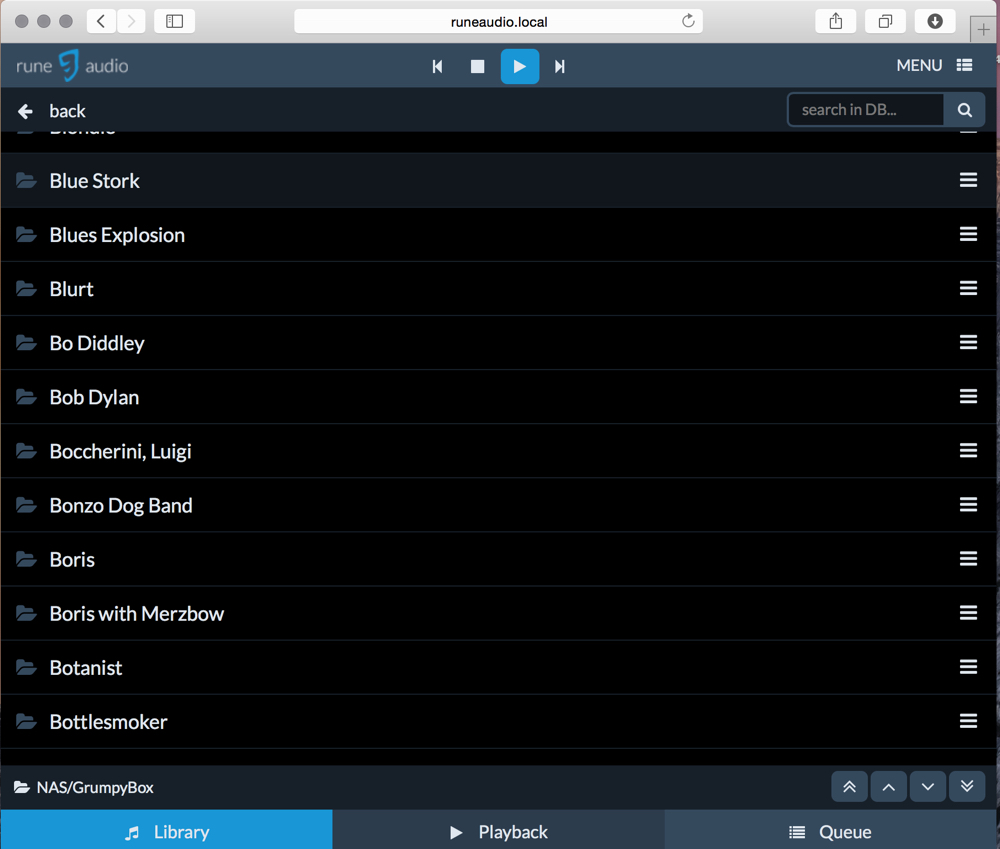 Artist names seem to be derived from folder names rather than tags...[/caption]
[caption id="attachment_3348" align="alignnone" width="1000"]
Artist names seem to be derived from folder names rather than tags...[/caption]
[caption id="attachment_3348" align="alignnone" width="1000"] ...as are album titles...[/caption]
[caption id="attachment_3349" align="alignnone" width="1000"]
...as are album titles...[/caption]
[caption id="attachment_3349" align="alignnone" width="1000"] ...but the actual song file tags appear to be properly used.[/caption]
Once you reach your artist, album or track, you can add it/them to the playlist by clicking the symbol of three horizontal lines over on the right hand side of the window - several options are offered (including the option to update this folder).
Overall, the Rune UI offers really rather nice and clean interface. The volume control (you need to choose software volume control in the MPD settings screen) can be a little slow to respond. And I do question the player controls at the top of the main windows. This shows buttons with the classic previous; stop; play and pause; and next symbols. Strangely, the play/pause button shows the currently selected function, rather than the option available on the next click.
At this point, I decided to switch to Spotify. I’d already entered my account details in the Settings page. It turns out that when you select Spotify in the Library screen, up comes a pop up thriugh which you can change renderer from MPD to Spotify (there are a couple of other options which I haven’t tried yet). You need to do this to get to Spotify.
Once in Spotify it’s really easy to select your playlists. Hoever, it seems to me that the software volume control doesn’t work when you’re using the Spotify renderer.
[caption id="attachment_3350" align="alignnone" width="1000"] Playlists in Spotify. I'm not sure how Rune handles Spotify playlist folders[/caption]
I was initially baffled as to how to switch back to the NAS - just going to back to the Library screen doesn’t work - the selection of NAS is just dead. I puzzled over this for a while, before I realised that I needed to click on a small MPD button on the Playback screen - this is just above the album art - before going back to the Library screen. This brings up the same renderer screen as appeared when Spotify was first selected. Choose ‘MPD’, and after a while the setting is changed. Look out for the little popup notification window. If you have a playlist of tracks located on the NAS that you’ve not completed, it will resume. Anyway, once you’ve returned to MPD you can go back to the Library screen and navigate the music on the NAS.
Useful tip: there are some good functions available at runeaudio.local/dev if you get the system stuck. There’s also an option to update the system from github.
Pros and Cons
+ Neat and straightforward once set up; + Doesn't need a separate music server; + Administering the unit via the web interface is nice; + Good unbroken stream via USB DAC; + Really easy to as last.fm and Spotify account details; + Handles Spotify playlists well
- More limited in features than PiCorePlayer/LMS (not surprising, LMS has had more years of development); - Some menu items are a bit awkward; - Doesn't seem to like Spotify Playlist folders; - MPD appears to use folder names (rather than tags) to set up the navigation hierarchy
Next up, I want to try getting Rune to run the Wolfson DAC card, as among other things it's supposed to have a hadware volume control - supposed to be OK out of the box, but I've not had too much luck so far.
Postscript: 24h after getting all the above to work, the RuneAudio player can't mount the NAS folder. So I've reverted back the PiCorePlayer on the LMS system, at least for the time being.
After Apple replaced my 2 gigabyte first generation iPod Nano with a nifty little 8Gb sixth generation model (due to a product recall), I found myself using that in preference to my Cowon X7, even though the latter has 160Gb storage. The consequence of this is that I allowed the X7 to completely discharge.
No problem, I thought, just charge it up again. But no! Things are not that simple. It transpires that the Cowon firmware doesn’t take kindly to a fully discharged battery, and won’t let it charge. I did a spot of Googling, and discovered a suggested solution - to connect it to the charger for a long period - 100h was mentioned.
Well, I tried that, to no avail.
A second suggestion was to open up the case, and briefly short out two wires that connect the main circuit board to the battery. This then resets the system so it can charge the battery. Opening the device was quite tricky. It’s held together by four tiny T6 torx screws. A visit to the workshop, and the screws were out. The two halves of the case are clicked together, and took a bit of leverage to separate. This done, the innards are exposed - everything remains attached to the front of the case.

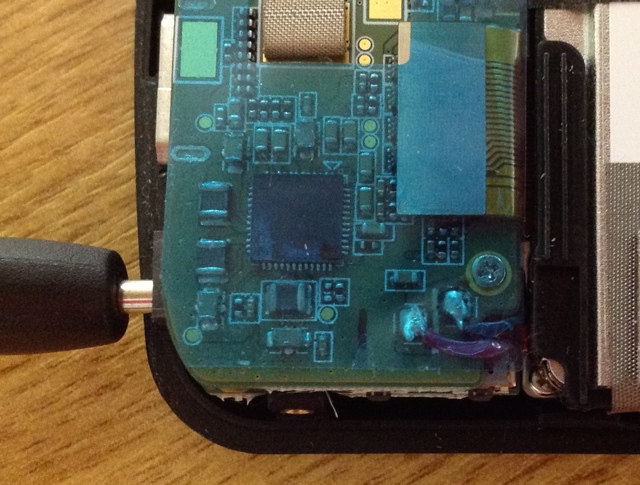
This is what's revealed when the back of the unit is removed. Most of the space is occupied by the hard drive and the battery. The PCBs on the left are partly covered by a thin blue film of insulator.
Here’s a close-up showing the connections that need to be shorted. You need to gently peel back the blue film, then use a paperclip or similar to short out the two soldered joints (black and red wires) at bottom right.
After that, the device starts accepting charge again. A couple of hours later, the battery was fully charged and I was ready to go.
This problem seems quite widespread and I saw several instances in discussion forums around the web. It does appear to be a significantly bonkers design flaw. Still, now I know what to do!
 This is a rough illustration of my current implementation of a network of Squeezebox players linked to a NAS (GrumpyBox) running Logitech Media Server (LMS). It consists of several Logitech Squeezeboxes, a couple of iPads that are playback-capable through apps such as SqueezePad and iPeng, and the software Squeezebox emulater, SqueezePlay. To this I have recently added a Raspberry Pi running piCorePlayer. I also have a second Raspberry Pi running Squeezeplug, which has its own instance of LMS (not shown in the diagram).
I've summarised the usage cases of the three setups I have tried in the table below. My opinion can be summarised as:
This is a rough illustration of my current implementation of a network of Squeezebox players linked to a NAS (GrumpyBox) running Logitech Media Server (LMS). It consists of several Logitech Squeezeboxes, a couple of iPads that are playback-capable through apps such as SqueezePad and iPeng, and the software Squeezebox emulater, SqueezePlay. To this I have recently added a Raspberry Pi running piCorePlayer. I also have a second Raspberry Pi running Squeezeplug, which has its own instance of LMS (not shown in the diagram).
I've summarised the usage cases of the three setups I have tried in the table below. My opinion can be summarised as:
- If all you want to do is run a media player connected to an existing LMS, choose the piCorePlayer option.
- If you need to set up a media server as well as a player, choose the Squeezeplug option.
- By far the most versatile of the two DAC cards I've tried is the Wolfson DAC - if you want to use this, then Squeezeplug or the custom Wolfson kernel options are best.
- Both Squeezeplug and piCorePlayer work well with USB DACs
| Squeezeplug | piCorePlayer | Wolfson kernel | |
| URL | website | website | website |
| Usage | Convenient low cost LMS server and player | Low cost and easy to use player. Configured via web interface. | Wolfson supply a patched image supporting the DAC. Squeezelite can easily be installed and configured |
| LMS | yes | no | no |
| Guide | Squeezeplug wiki | I also described this installation here. Instructions at the piCorePlayer website | I described this here |
| Wolfson DAC | supported | not supported | supported |
| HiFiBerry | supported | supported | |
| Notes |
1, 4 |
2, 3 |
- May require powered USB hub if a USB-powered hard drive is used with LMS
- piCorePlayer is run solely from RAM. The Pi can be powered off without corrupting the SD card
- Also supports the Sabre DAC and the HiFiBerryDigi card though I’ve not tried these
- I set up a script for a button press to shutdown the Squeezeplug (and the Wolfson kernel) systems so the Pi can be safely powered down. See here.