Indoor Training Part 5 - Rouvy in Workout Mode

Since the beginning of 2024 I've been increasingly using the Rouvy app in my indoor bike training (see Indoor Training - Part 3 Rouvy vs Zwift and Fulgaz). Until the other day I'd only been using this to enliven my indoor cycling on otherwise very dull interval sessions, but I thought I ought to give Rouvy's workouts a bit of a try. And I'm rather impressed.

The Rouvy website has a very clear description of how this all works. So I needn't offer more than a few comments, based largely on using Rouvy on the AppleTV.

  • The clarity of the information presented on the screen is excellent, though some of the elements are partly offscreen (this may be how I set up the AppleTV.
  • Rouvy has the easiest system for designing custom workouts in the apps I've tried. Zwift's workout designer is clunky and it's easiest to use a third party system and then upload the workout. TrainerRoad has a clunky and quixotic system in a standalone app that then synchs the workout back up to TrainerRoad.


About Flies & Bikes

Flies & Bikes is a website/blog that I started some years ago. Initially I was writing about my interests in Science and my hobbies which include cycling (touring and racing) and tech stuff. At the time I was a University academic, but as my time available to blog waned, the focus shifted towards cycling and tech, then eventually it entered a rather fallow period. 

Along the line, I transitioned from Joomla to Wordpress. I've now reverted back to Joomla - in doing so, I dropped various comments on blog articles (there weren't very many) as the transition, while automated leaves quite a lot of manual rearrangement to be done.

Now retired, I may return to writing about science...

I also maintain the following websites:

Screenshot 2023 11 08 at 17 24 12 Home 945x1670

Northwood Wheelers - a website devoted to cycling club life in 1950s England, as seen through a member of the Northwood Wheelers. I maintain this in memory of my late father.

Screenshot 2023 11 10 at 07 50 30 North Bucks Road Club

North Bucks Road Club - this is the website of my current cycling club.

Screenshot 2023 11 08 at 19 37 38 Team Grumpy 908x1536

Team Grumpy - a website focussing on the 2-up team time trials I ride. 

A Second Raspberry Pi Squeezebox

In my first foray into Raspberry PI, I set one up as a Squeezebox networked music player using piCorePlayer - this one has a HiFiBerry DAC card and is remarkably easy to use - to switch it on or off you just plug in or unplug the power respectively. For the new project, I wanted to try the new Wolfson DAC card from Element 14, particularly as I was getting occasional crackles and pops from the USB output in Raspian. This DAC isn’t currently supported by piCorePlayer, so I was keen to take a different route. I ended up with a media player that didn’t have an obvious way of shutting it down, other than via the command line. So I wanted to figure out how to add a pushbutton that would shut the Pi down to state in which it can be powered down.

Installing the Wolfson DAC

Installing the Wolfson DAC card is pretty straightforward. It uses a set of sprung connectors to conenct to the P5 header of the Raspberry Pi, pushes on to the P1 header and fixes in place with a plastic screw. The screw is important to make sure the connectors are held against the P5. I didn’t bother with trying to set the DAC up with a stock Raspbian OS - Element 14 have an image file of a modified Raspbian with all modules etc set up from the get-go. It can be downloaded from here, though I found that the file wouldn’t unzip on my Mac, unless I used Keka, a third party archiver utility available from the App Store. There’s some discussion on the Element 14 discussion forums about the unzipping problem. I set up wifi and installed squeezelite as described in this tutorial - all pretty straightforward as I have a fair bit of Linux experience. I’m using an unbranded wifi USB stick that steadfastly refused to work with piCorePlayer - but it seems fine in Raspbian. In use, the Pi starts squeezelite when it boots, and it’s then visible to the LMS web interface and other squeezebox control apps such as SqueezePad and iPeng. I was using a terminal to shut the Pi down via the command line before powering down. This seemed less than ideal, so I investigated setting up a ‘shutdown’ push button switch for an easier and more orderly shutdown.

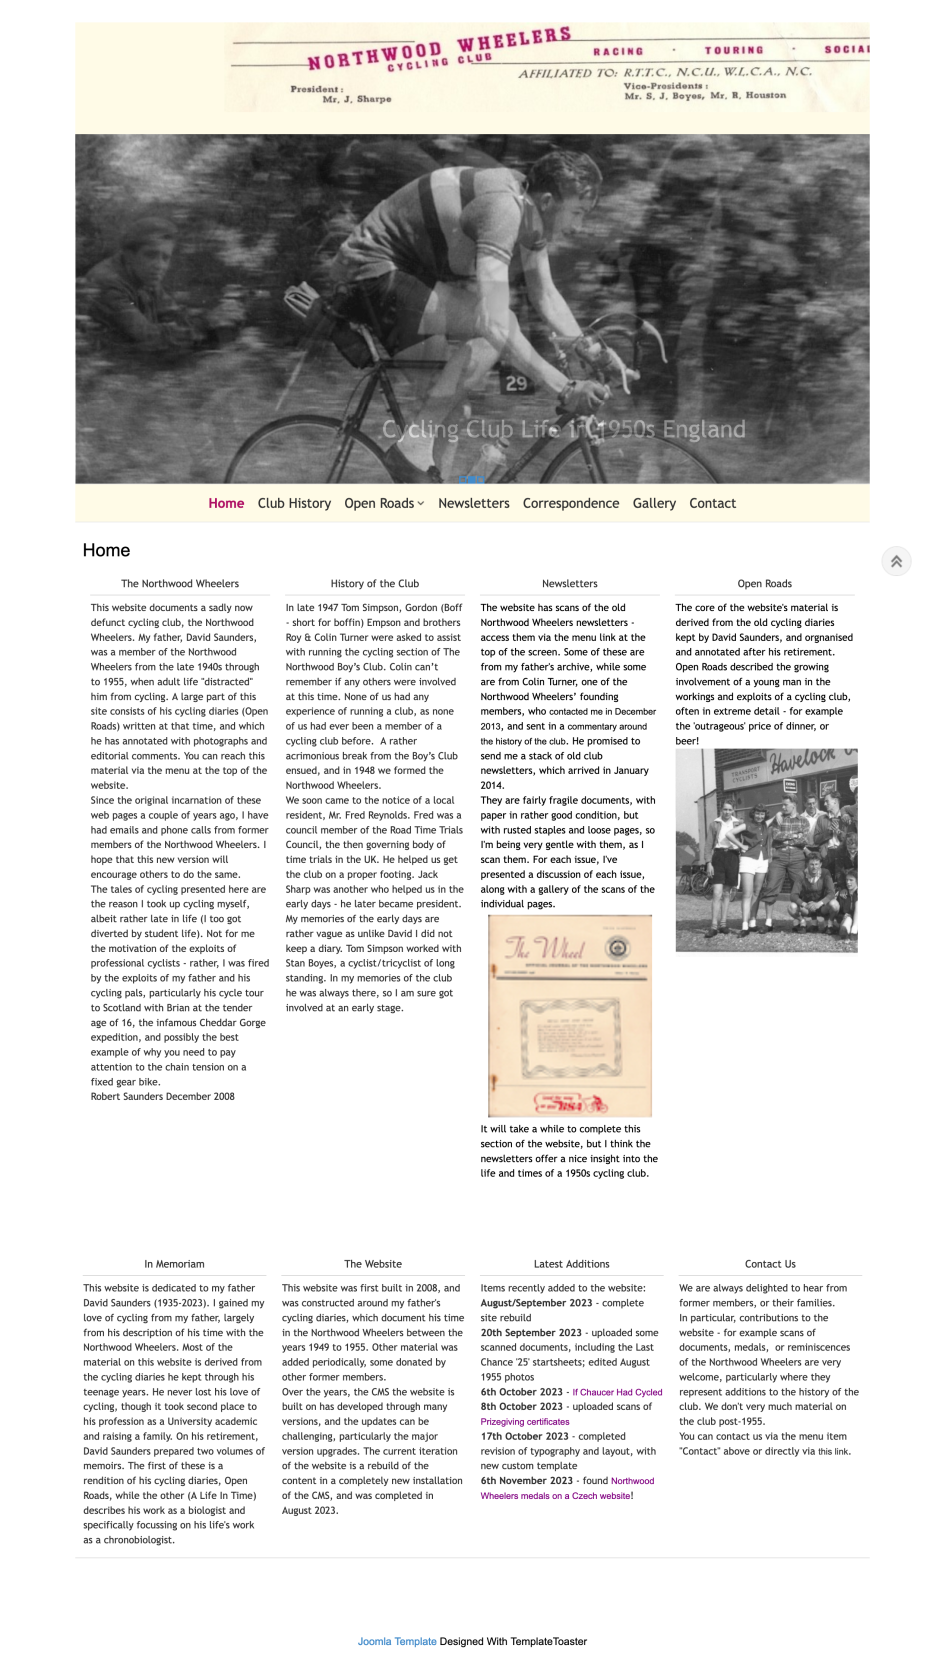
 3 Pin Header on the Wolfson DAC

The Wolfson DAC pretty much covers the main set of header pins, and makes three of these available via a three pin header on the card (referred in this thread).

Wolfson_Card_J8-1:RPI_TX  ->  RPi: P1-08 - TXD0 (ALT0) - GPIO14 Wolfson_Card_J8-2:RPI_RX  ->  RPi: P1-10 - RXD0 (ALT0) - GPIO15 Wolfson_Card_J8-3:GND

[caption id="attachment_2527" align="alignleft" width="400"] The J8 Header[/caption] (GPIO14 is the pin closest to the edge of the DAC card, and GND is the one furthest from the edge). I connected a pushbutton switch on a breadboard to GPIO14 and GND for testing purposes.

Setting up the shutdown script.

Bearing in mind I’d never done any prior work with hardware interfaces, and never done any python work, this proved an interesting exercise! First, I installed RPi-GPIO:
sudo apt-get update
sudo apt-get -y install python-rpi.gpio
I don’t recall installing the time and os Python modules, so I assume they are there by default. I copied the shutdown code (from here) and saved as /home/pi/scripts/shutdown2.py. Note that the comment lines indicate sources - all I had to do was to edit the pin numbers from the original to use Pin 14.
# This script will wait for a button to be pressed and then shutdown
# the Raspberry Pi.
# http://kampis-elektroecke.de/?page_id=3740
# http://raspi.tv/2013/how-to-use-interrupts-with-python-on-the-raspberry-pi-and-rpi-gpio
# https://pypi.python.org/pypi/RPi.GPIO
 import RPi.GPIO as GPIO
import time
import os
 # we will use the pin numbering of the SoC, so our pin numbers in the code are
# the same as the pin numbers on the gpio headers
GPIO.setmode(GPIO.BCM)
 # Pin 14 will be input and will have its pull up resistor activated
# so we only need to connect a button to ground
GPIO.setup(14, GPIO.IN, pull_up_down = GPIO.PUD_UP)
# ISR: if our button is pressed, we will have a falling edge on pin 14
# this will trigger this interrupt:
def Int_shutdown(channel):
# shutdown our Raspberry Pi
os.system("sudo shutdown -h now")
# Now we are programming pin 14 as an interrupt input
# it will react on a falling edge and call our interrupt routine "Int_shutdown"
GPIO.add_event_detect(14, GPIO.FALLING, callback = Int_shutdown, bouncetime = 2000)
# do nothing while waiting for button to be pressed
while 1:
        time.sleep(1)
To run the script at startup, I added this line to rc.local:
sudo python /home/pi/scripts/shutdown2.py
One reboot, and voila! My first attempt to use Raspberry Pi GPIO pins was a success! I’ve now soldered the switch to a couple of push-on connectors which fit to the J8 pins 1 and 3 (GPIO14 and GND respectively), so it’s a little fragile in the absence of a proper case! Pressing the shutdown button shuts the system down. I suspect that a reset button connected to Header 6 would re-start the device from that state, but I’ve yet to investigate. I’m presently using this Pi as a small player to drive a pair of headphones - it sounds rather good. Here's a photo of the finished device: [caption id="attachment_2526" align="alignleft" width="1000"] Raspberry Pi with Wolfson DAC (click to enlarge)[/caption]

HiFiBerry DAC for the Raspberry Pi

I mentioned at the end of my previous blog article on the Raspberry Pi that I had a DAC board in transit. Well it has arrived, I’ve fitted it and after a few trials and tribulations, it is set up and working well. The attraction of having an onboard DAC in the Pi is really one of neatness. It also frees up one of the USB ports that I would otherwise use to feed a USB DAC (for example I can boot the Pi into Squeezeplug, and use the Pi as a Logitech Media Server with Squeezelite as a player). The case that I’m using for the Pi doesn’t really offer a lot of room for manoeuvre when installing additional boards, but in the end I bodged together a neat enough solution. The HiFiBerry The HiFiBerry DAC is a small printed circuit board about half the area of the main Raspberry Pi board. It attaches to a set of 8 connecting pins - the onboard sound connector P5 - you have to solder an 8-pin header to the Raspberry Pi main board first. I’d ordered the board with two RCA connectors, but no headphone style jack plug. The RCA connectors were three pin sockets, obviously intended to be soldered to the board. It was immediately clear that this would mean the Pi would no longer fit in the case, so I decided to connect the RCAs via wires to the board, and mount the RCAs in the lid of the case. The board came with the GPIO and P5 sockets already soldered. Assembly Step 1 - I soldered the P5 header to the Raspberry Pi board. This proved pretty easy. The P5 sits right next to the GPIO connectors. Step 2 - I soldered four wires to the output terminals intended to output to a 3.5mm jack. Two from GND to the GND tag of the RCA sockets, and one from the L and R channels to the appropriate tag of the RCA sockets. Step 3 - I drilled two holes in the case lid. I also needed to remove some bits of plastic from what appear to be strengthening ribs in the case lid to allow it to fit over the HiFiBerry board. I fixed the RCA sockets into the holes, which needed a spot of araldite to hold them firm. Step 4 - I mounted the HiFiBerry board on the P5 connector - it also slots onto the GPIO header for added support. The card came with a polythene pillar and screws to further support it in place, so I fitted those. Step 5 - I assembled the case back together, inserted the SD card and booted the Pi. [caption id="attachment_2499" align="aligncenter" width="300"]Upper side of HiFiBerry board Upper side of HiFiBerry board[/caption] You can see the wiring I added to connect the RCA sockets to the board. Obviously, the sockets supplied are intended to be soldered to the board in the positions labelled 'Left' and 'Right'. [caption id="attachment_2501" align="aligncenter" width="300"]The underside of the HiFiBerry board The underside of the HiFiBerry board[/caption] There's not much to see on this view of the HiFiBerry - other than my soldering, and the two connectors that attach the board to the Raspberry Pi - the board came with these already fitted. Using the piCorePlayer web interface, I selected the option for the HiFBerry DAC, determined the ALSA settings for the HiFiBerry and entered them, and saved the whole setting to the SD card. Then I excitedly hooked up the phono cable to my amplifier, booted the Pi and sat back to listen to the music. Well, I could listen to the right hand channel, but the left channel was sadly absent! A problem! Clearly I’d done something wrong! I referred to the forums on the HiFiBerry site. Most people having this sort of trouble had evidently made minor cockups with soldering, though there were hints that some cards may have been defective. A quick email elicited a rapid response suggesting I check the connectors for evidence of shorting out. I did this, finding no problems. As an aside, I found Daniel at CrazyAudio very responsive and polite in the face of a neophyte solderer asking questions. A little while later, it occurred to me that the two non-ground pins of the RCA connector might not be equivalent - in particular, it wasn't easy to see how they connected within the socket. I plugged in an RCA plug into the L channel socket and used my multimeter to determine if the signal wire from the plug actually made electrical contact with the tag to which I’d soldered the wire from the board. It didn’t, so after a bit more investigation I detached the wire and soldered it to the third tag of the connector. At this point the Pi was properly outputting audio from both channels! Triumph! So, how does the Pi perform as a media player with the onboard DAC? First impressions are that it compares well with the two external DACs I have available, though both are budget items (a Cambridge Audio DACmagic 100 and DACmagic XS). More on this later, though I'm not really a serious audiophile and I've no way of doing a proper blind test.

My month in cycling - January

I'm a little late with this update, but since things are as usual a bit quiescent in January that's not so important. After the New Year's Day '10', I've been trying to knuckle down to some proper training. As usual, this corresponds to quite a lot of turbo training, and if anything this aspect has assumed greater proportions than in previous years, since the weather has been frankly hideous! Unfortunately my working pattern has made effective training something of a challenge. It's too early to say whether my form is coming along well (my feeling is that I've plateaued a bit since Christmas), but at least I've survived so far without illness or injury. I managed to cock up some dates in March, so due to work commitments I won't be riding the usual season-opener, the Port Talbot Wheelers 2-up '25'. Instead, Team Grumpy will ride a '10' on a similar course - solo of course - a week earlier. On website matters, the site devoted to a defunct bike club - the Northwood Wheelers - that I maintain had a bit of a boost over Christmas after a former member made contact and sent some memorabilia, including 20 issues of the club newsletter/magazine dating from the 1950s. These have now been scanned in and can be read online. After the last North Bucks Road Club AGM, I've taken over the club chairman role. This means I have to attend all the meetings so I can chair them! This as well as maintaining the club website...