New tandem, part 4
One of the main reasons for buying a new tandem was an improvement in transportation. Not, I add, in transporting us and our luggage but in transporting the tandem by car. In the UK it's pretty much impossible to travel by train with a tandem, so each time we plan a cycle tour, we need to allow for getting the tandem to the starting point using our car.
Many years ago, when we started out with a tandem, we struggled to find an affordable roof bar attachment (I can recall asking a shop assistant to check that he hadn't confused a price with a catalogue number) and eventually obtained what was really a home-made affair that sadly has now developed a crack. Along the way, we've tried other setups, but most have some kind of design problem that doesn't suit us. The alternative, of course, is to carry the tandem in the car, rather than on the car. And because we don't have a transit van or similar, this really requires the tandem to be taken apart. The easiest way is to have S&S couplings built into the frame - and it's best to arrange this at the time a frame is built. Our new tandem was specced with S&S couplings to separate the front section of the frame. This adds a relatively small weight to the bike, though this is really pretty insignificant, and a shade under £800 to the price. You can see the S&S couplings in the picture below - they are the silver parts in the frame tubes just in front of the front seat tube. The tandem - S&S couplings visible in front of the front seat tube
Of course, separating the tandem frame at those points leaves several cables and the hydraulic disc brake hose to be disconnected, and this needs to be done before splitting the frame. The Rohloff hub has an easily removed EX gearbox - by just unscrewing the knurled nut.  The small black part with two cables attached is the gearbox
In the picture you can see the two gear cables and the knurled nut that you unscrew to remove the gearbox. Thorn have specified a cunning set of braze-ons (just visible to the left), that allow the two gear cables to be removed easily from the frame. Here's the gearbox a few moments later - removed, with the knurled nut screwed back in to the wheel avoid losing it (which would be a bit of a cockup!).  Rohloff EX gearbox removed
The gearbox and cable were coiled up and popped in a drawstring bag and placed in the front bottle cage. The hydraulic brake hose is a bit more complicated, and to avoid fluid leak, the approach here is to remove the brake lever from the bars. The braze-ons for the hose have plastic clips, which can be easily prised off to free the hose from the frame. The lever and the coiled up hose are placed in a second drawstring bag and travel with the rear section of the bike. 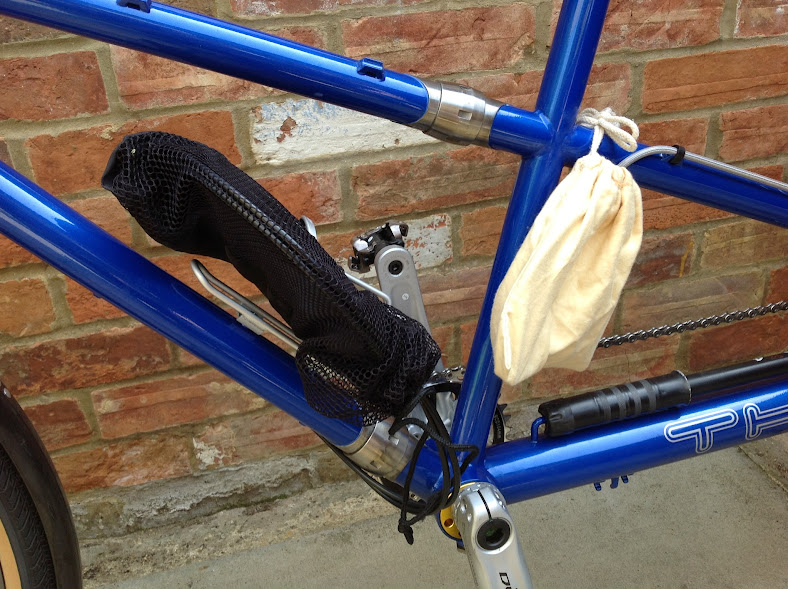 Gearbox and cables in black bag, hydraulic brake lever and hose in light coloured bag.
Finally, the rear V-brake cable is split using a screw connector. The bike's then ready for splitting the frame. We removed the stoker bars. Unscrewing the couplings is pretty straightforward, using the lockring tool supplied with the tandem. The frame comes easily into two parts. The front section turns out to be well-balanced for handling by holding the handlebar stem - here's an end-on view of the open couplings:  The open S&S couplings
And then, the make or break moment. Would the rear section of the tandem fit in the back of a Ford Focus? We removed the parcel shelf and dropped the rear seats. And...yes, it did fit: 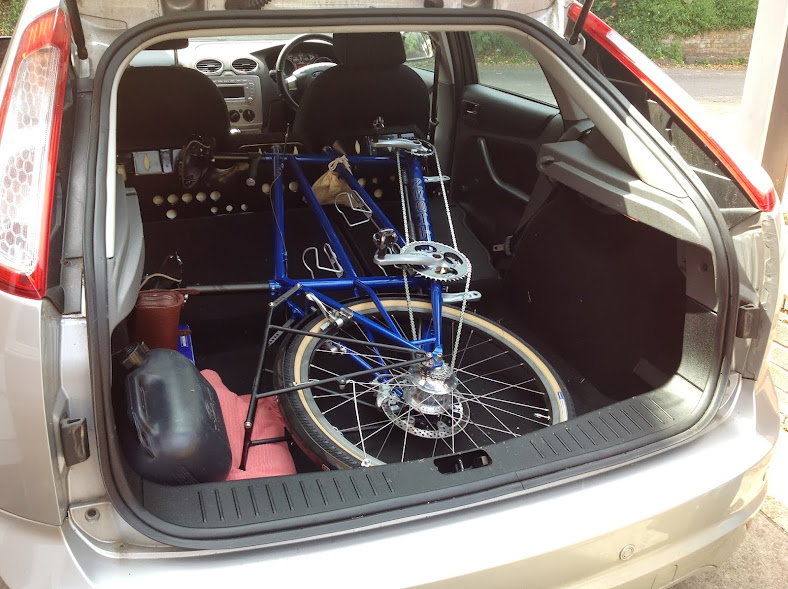 The rear section of the tandem in the car
The front section can be laid on top very easily. I think for quick transport that's all we'd do. For packing a car with more luggage, we would probably make some changes, such as removing the pedals, turning the front bars through 90 degrees, possibly removing the saddles and seatposts. This would allow a little more flexibility in packing the bike into the car. As it is, the disassembly we did took only a few minutes. And reassembly? It was trivial. I did find that the ease of handling the front section mentioned above was pretty useful in positioning the two frame sections for re-joining. Essentially you just do a reverse of the disassembly procedure described above. Tools needed: 5mm allen key (for handlebars and stems), 4mm allen key (for the disc brake lever), lock ring tool (came with the tandem). The order of disassembly:
- Remove rear handlebars (in other circumstances we might remove saddles and pedals here)
- Remove gearbox, disengage cables from frame, coil and bag
- Remove disc brake lever from bars, unpop hose from frame braze-ons, coil and bag
- Unscrew rear V-brake connector
- Unscrew S&S couplings
When you subscribe to the blog, we will send you an e-mail when there are new updates on the site so you wouldn't miss them.
Comments